How to start an online store in India for your Fashion and Apparel business
The COVID-19 pandemic has had a profound effect across all industries. No matter what sector your retail business operates in, the downturn has undoubtedly influenced your sales, and the outlook for the coming months remains uncertain regarding business growth. Website traffic is going down, and many businesses are facing challenges because their website doesn’t drive leads effectively. As a result, many are considering how to launch an online store in India.
While experts from Economic Times and GQ predict that it will take over a year for the retail sector to fully recover, the current situation underscores a significant shift in consumer behavior towards online shopping, especially with news of the lockdown easing for non-essential businesses after April 20th. This shift makes it crucial to focus on website development to adapt and thrive in this evolving market.
In this detailed guide, we provide a step-by-step approach to launching an online store for your fashion and clothing business, equipping you to adapt to the new normal and achieve success.
Table of content
- How Would Online Fashion Shopping Work?
- How to start an online store: Step-by-step to start an online clothing store
- Need help in understanding how to start an online store
How Would Online Fashion Shopping Work?
Shopping for fashion online will soon become as routine as buying everyday essentials. Just as grocery stores and other essential retailers have established their presence online, fashion brands will follow suit. To effectively connect with customers, it’s crucial to understand how to create and launch an online store for your brand.
Retailers are adopting convenient solutions such as contactless doorstep delivery and in-store pick-up options. Here’s a glimpse into what a typical customer’s shopping experience might look like in this new landscape:
- Customers identify/ find the products they want to purchase and pay online
- The customer also chooses the delivery option – no-touch delivery or store pick-up
- You receive the order and begin preparing it safely according to their request
- If the customer chooses store pick-up while placing an order on your fashion and apparel online store, they will drive by your store and pick up the order at the date you mention
- If the customer chooses no-touch doorstep delivery, your delivery partner will pick up the order from your store and make the delivery

How to start an online store: Step-by-step to start an online clothing store
Step 1: Sign up on Shopify to start an online store
Register for Shopify development using an email address that you’ll use to handle all administrative tasks for your store. Choose a domain name that matches your offline brand name.
You can customize your domain name later, and we’ll cover how to do this in our guide on starting an online store for your clothing brand.
Before diving into domain personalization, create a logo for your online store using Hatchful by Shopify
Step 2: Design your store
To prepare your store for launch, the initial step is to tailor its design. While a default theme will be applied to your store, it’s crucial to make sure it aligns with your product range and embodies your brand identity. Here’s how to begin setting up your online store with a website design that authentically represents your brand’s story:
To begin, select a theme that aligns with your brand and the products you offer. You can browse fashion-specific themes right here.
Here’s how to explore themes: Go to the Shopify dashboard and click on ‘Online Store.’ From there, you can view all available themes on Shopify, including free options.
To make your search easier, consider these theme recommendations:
- Minimal Theme: Features a clean design that emphasizes product images and functionality.
- Brooklyn Theme: Offers a distinctive look with a prominent header image or video and a stylish design.
- Modular Theme: A premium theme that lets you showcase your unique style with eye-catching product highlight sections.

heck out how the Modular theme appears for a clothing store to get a better idea of its potential. Once you’ve found the theme of your choice, click ‘Add theme’ and the theme will automatically be added to your store.
Customize your theme
After choosing your theme, you’ll return to the ‘Online Store’ page. In the ‘Live Theme’ section, click on ‘Customize’ to infuse the theme with your brand’s unique style.
This action will direct you to the theme editor page, where you can adjust various elements of your theme to suit your preferences.
(I) Begin by uploading your logo. Click on ‘Header’ and you’ll see an option to upload your brand logo.
(II) Next, the sections available in your theme editor will depend on the theme you’ve selected. To add a new section, click on ‘Add section’ in the editor sidebar. You’ll see a list of available sections such as collection list, featured collection, featured product, newsletter signup, rich text, and video. Select the section you want to preview and click ‘Add’ to include it. You can then customize the section using the available settings. To remove a section, choose it and click on the ‘bin’ icon.
(III) After adding all your sections, switch to the ‘Theme Settings’ tab. Here, you can adjust colors, typography, and the appearance of your cart and checkout pages.
(IV) When you’re satisfied with your customizations, click ‘Publish’ to make your theme live. If you need to make more changes, click ‘Save’ and return to edit your theme later.
(V) Once you’ve saved your changes, click on the Shopify logo to return to your dashboard.
2. Customize your menu navigation
To streamline product and page searches for your customers, customize your store’s menu navigation. In the Shopify dashboard, go to ‘Online Store’ and select ‘Navigation.’
Click on ‘Main Menu’ to edit your top menu bar. Hit ‘Add menu item,’ enter a short name for the item, and paste the link. For dropdowns, drag the menu item under the desired parent item until the toggle icon appears, then drop it there.
After adding all necessary links, click ‘Save menu’ to finalize your changes.
3. Add important pages
To set up essential pages for your online store, follow these steps:
- Go to ‘Pages’ under ‘Online Store’ and click ‘Add page.’
- Name the page, input your content, and adjust the SEO settings, including the URL.
- For a ‘Contact’ page, select the ‘page.contact’ template from the dropdown to include a contact form below your content.
- Click ‘Save’ to finalize.
We recommend including these key pages:
- About Page: Share your brand’s story and values.
- Contact Page: Provide a way for customers to reach out for support.
- Privacy Policy: Detail how you handle customer data (samples are available online).
- Shipping Information: Describe your shipping process and delivery times.
- Return Policy: Outline the terms for returns and refunds.
- Hygiene Standards: Inform customers about your hygiene practices for products and their handling.
Step 3: Adding products
Now that you have your website design set up, it’s time to add your products to your store. There are two ways to do this:
- Upload products manually on the dashboard
- Upload products using a CSV file/ product spreadsheet
Uploading products manually on the dashboard
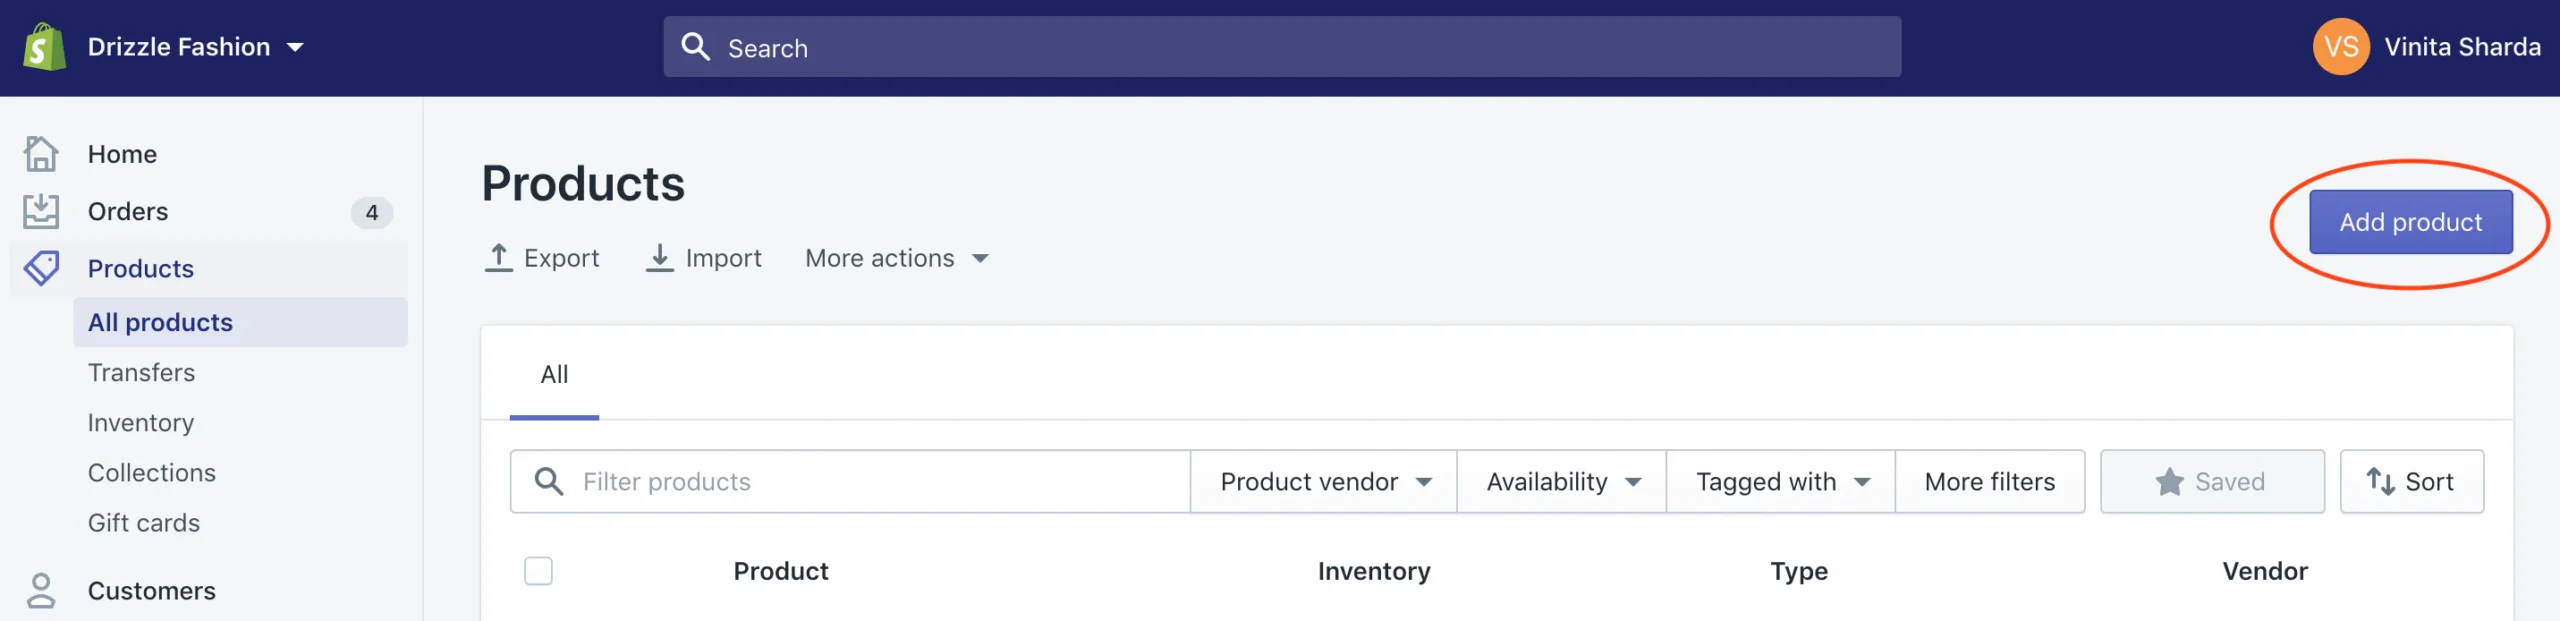
- In your store admin, select “Products” from the left-hand menu.

- Click “Add Products” in the top right corner to start adding items.
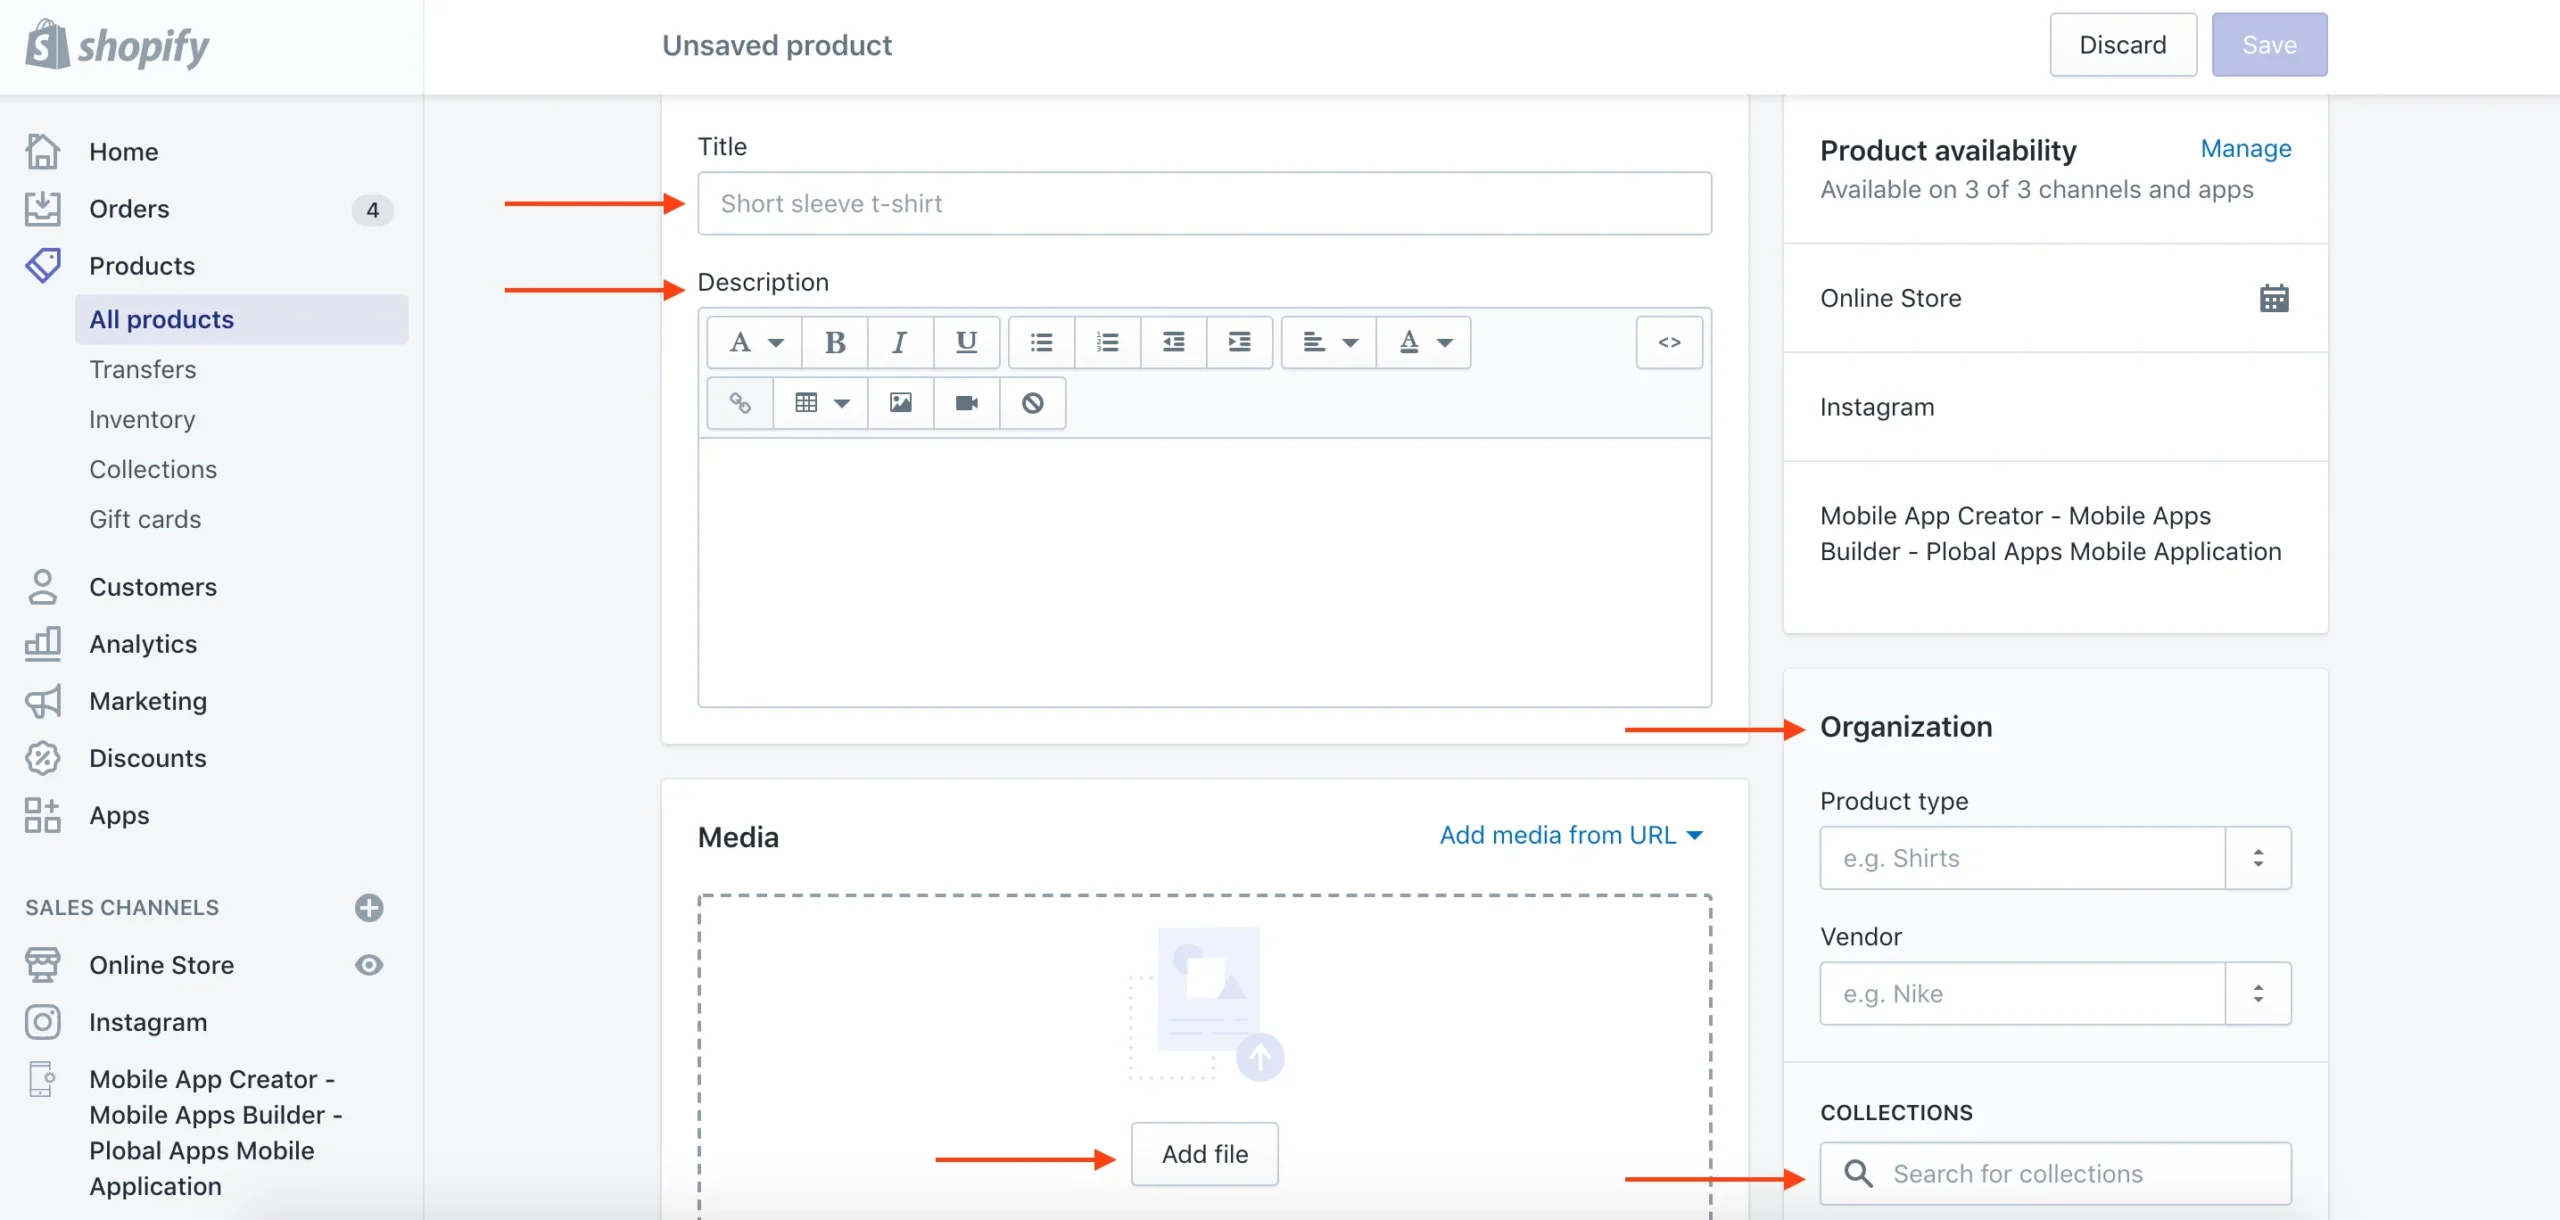
- Enter the product name, description, upload images and videos, and select the category/collection.
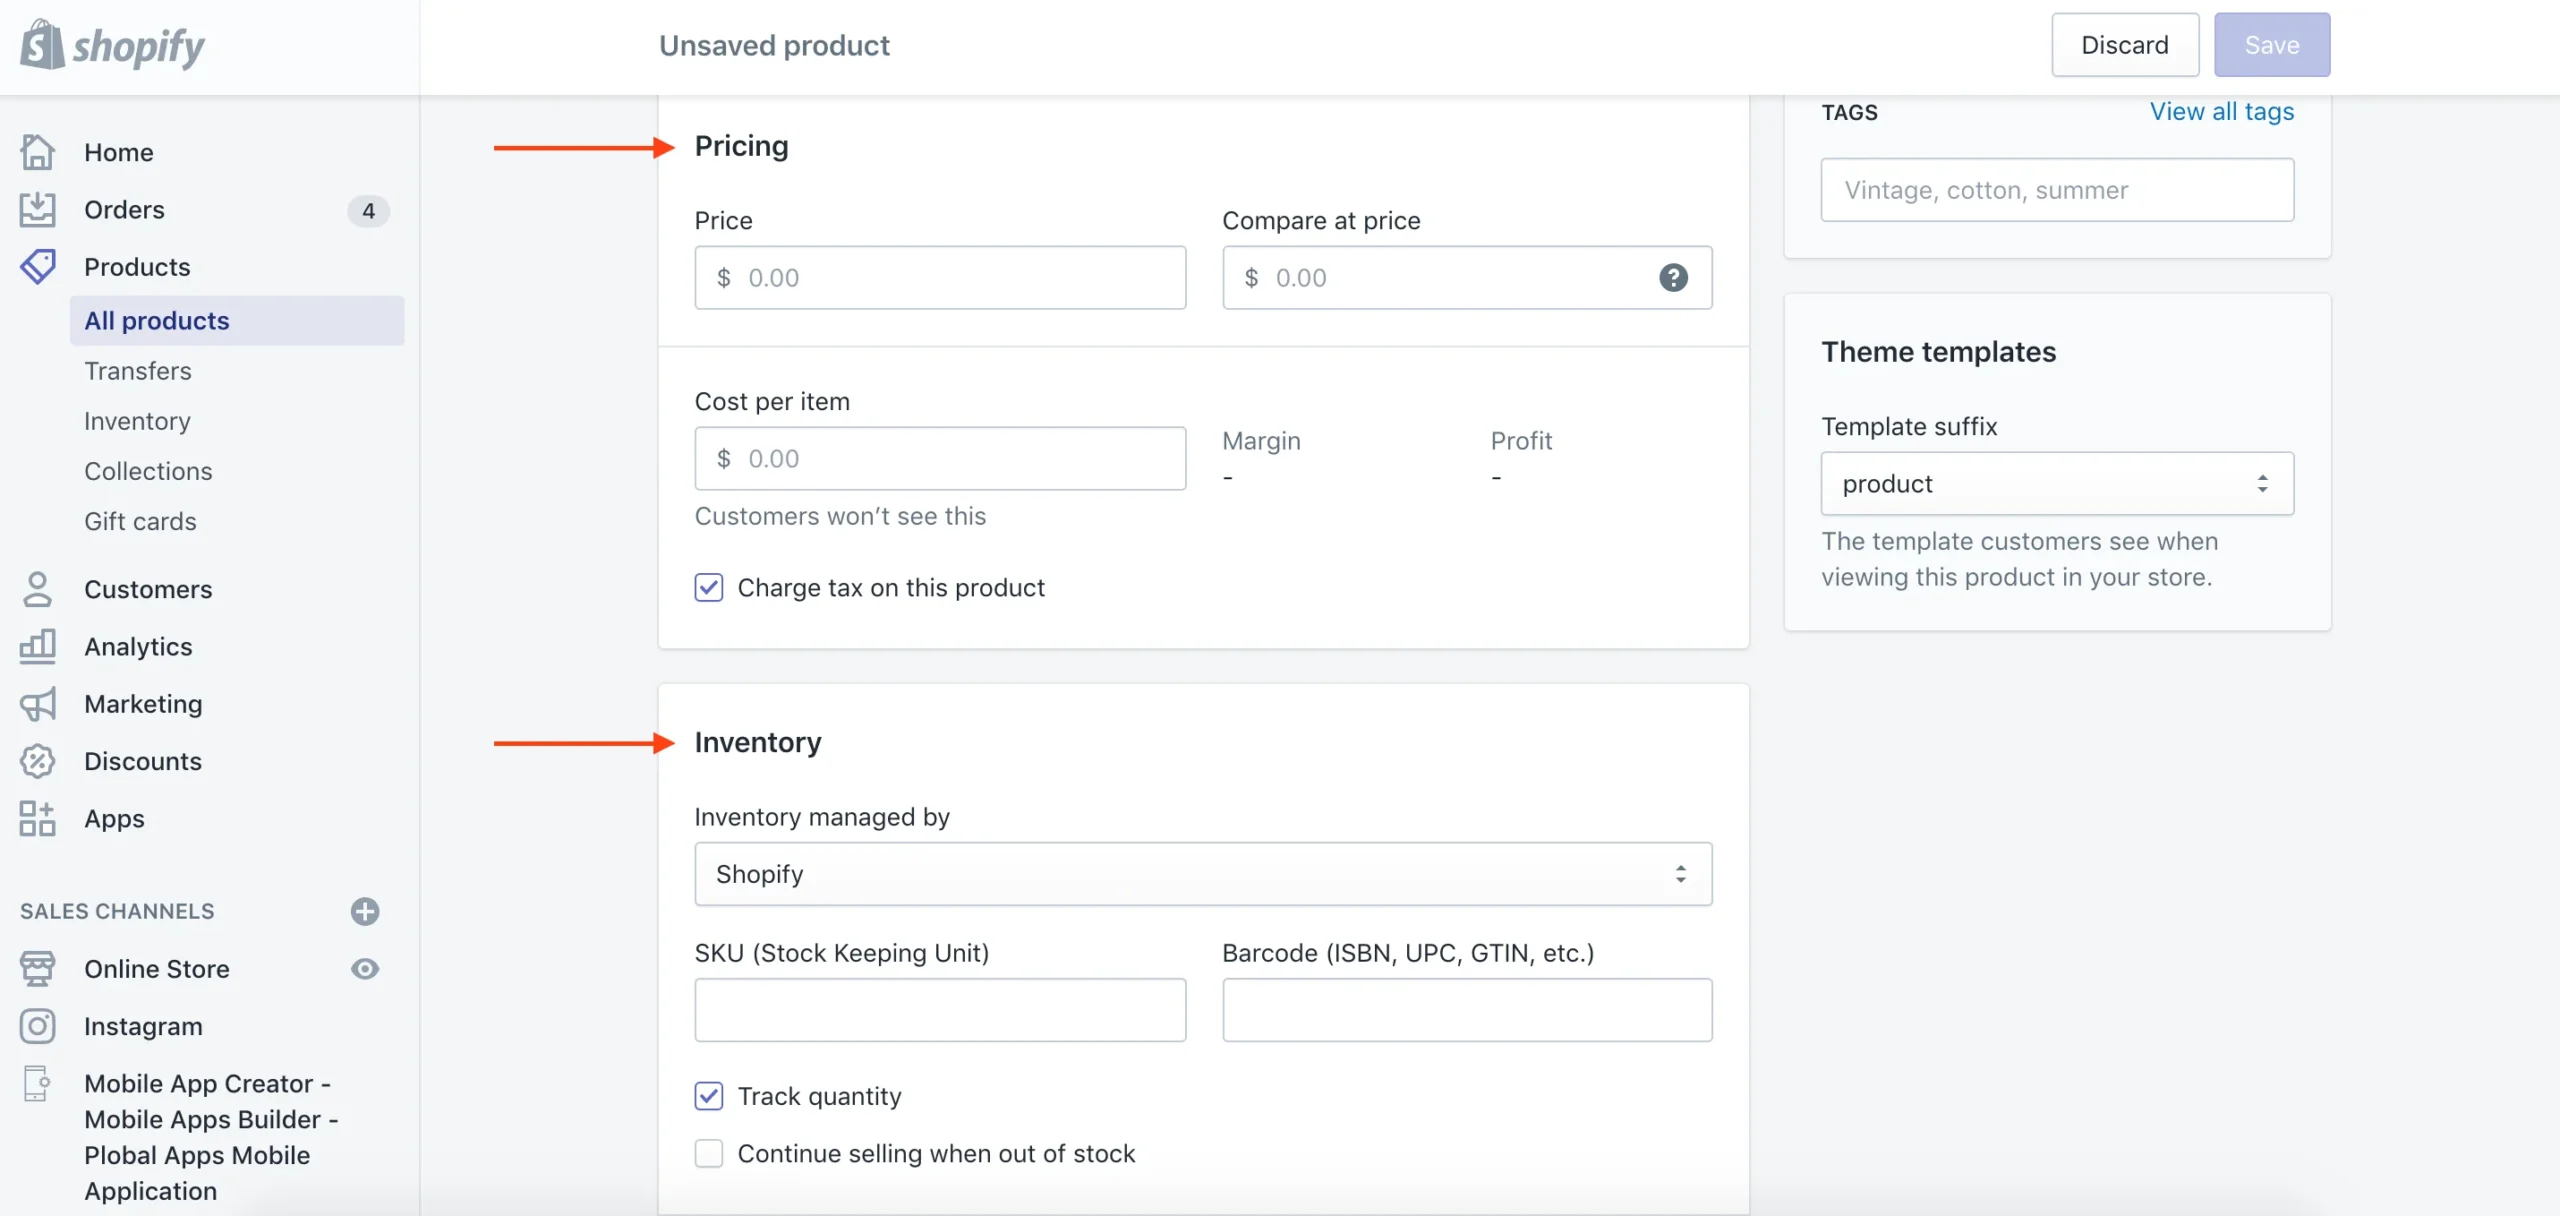
- Add pricing and inventory details on the same screen.
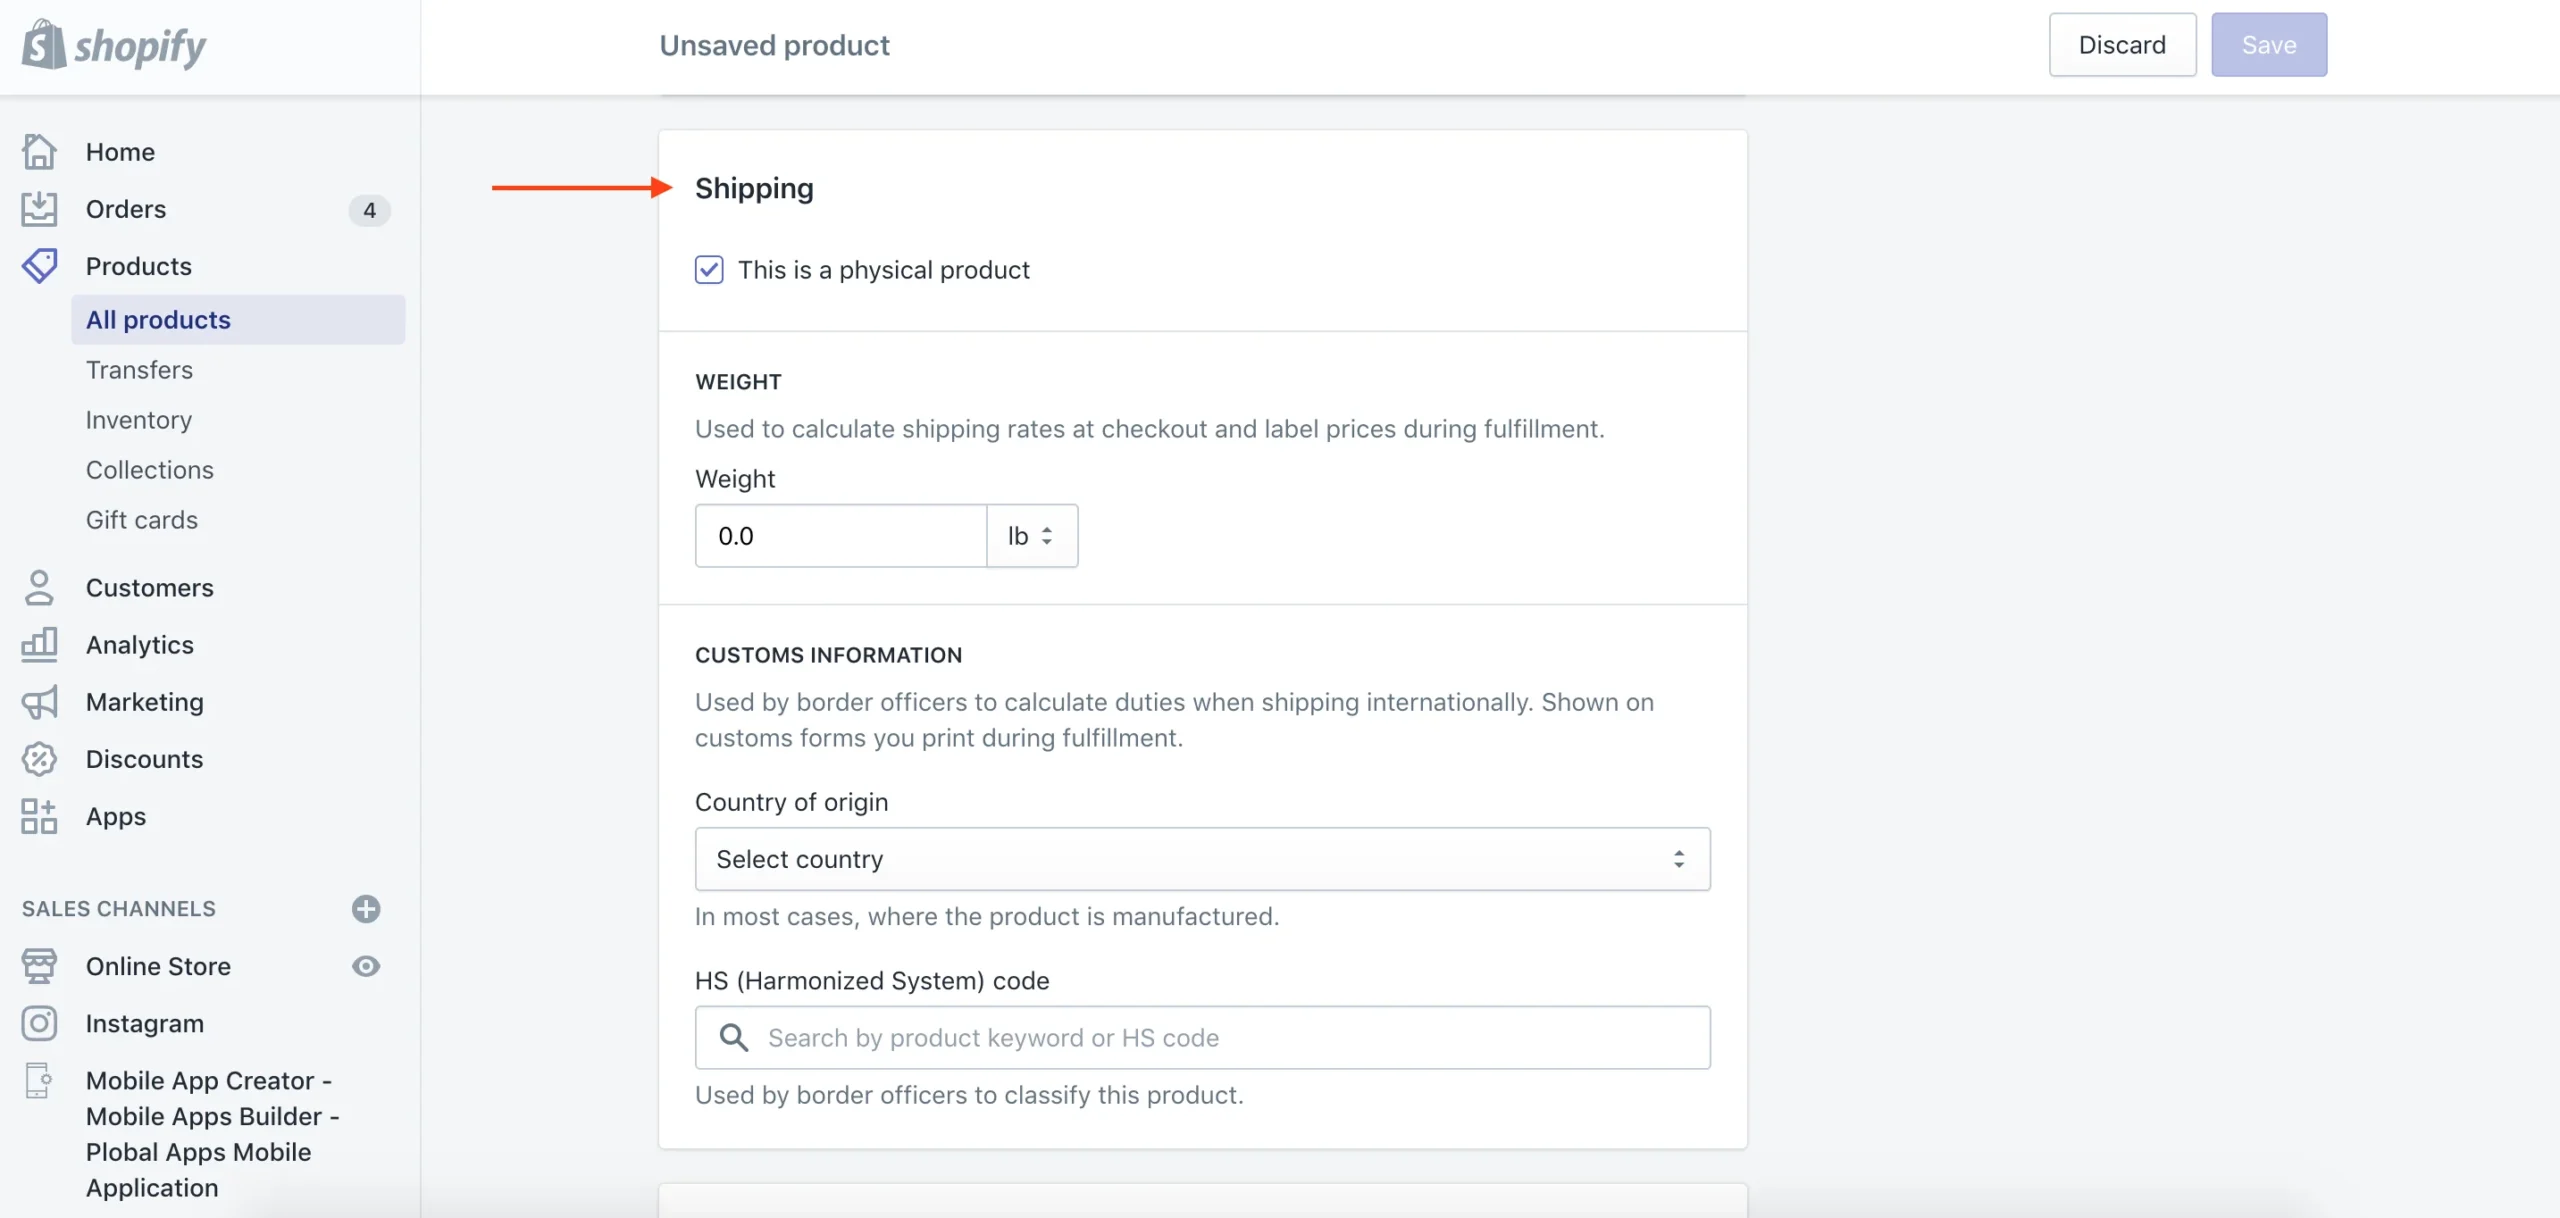
- Include shipping information for the product.
- If the product has different variants, such as styles or colors, make sure to specify them.
- Click “Save” to complete the upload and add the product to your store.
Uploading products using a spreadsheet/ CSV file
Prepare Your Product Spreadsheet For a large inventory, download and fill out the product template CSV with details such as product name, color, images, type, and variants.
Upload the CSV to Shopify Go to the Shopify dashboard, select ‘Products’ from the sidebar, and click ‘Import’ followed by ‘Add file’. Upload your CSV and click ‘Upload and continue’. Review the preview to ensure accuracy, then click ‘Import products’ to add them to your store.
Review and Optimize Product Pages Check your product pages to ensure URLs are short and optimized, images are clear, and text is error-free. Click ‘Online store’ in the sidebar, select ‘Customize,’ and review each product page. Use ‘Edit this product’ to make any necessary changes.
Step 4: Assist in making the right purchase
Shoppers accustomed to buying in your physical store may find online purchases challenging. To enhance their shopping experience and minimize returns, consider these strategies:
- Measurement Chart: Provide detailed and accurate measurements on your product pages. Clearly list top and bottom measurements and note if sizes run large or small.
- Live Chat: Add a live chat feature to answer customer questions in real-time. Automate common responses using tools like Gorgias or Tidio to link to size guides or product details.
- Product Videos: Supplement product images with videos to offer a better view of your items. Shopify allows easy video integration on product pages.
- Text on Videos: Use apps like Typito to add explanatory text to your product videos, helping customers understand key features.
- Video Calls: For high-end fashion items, consider video call support to guide customers and enhance their purchase experience.
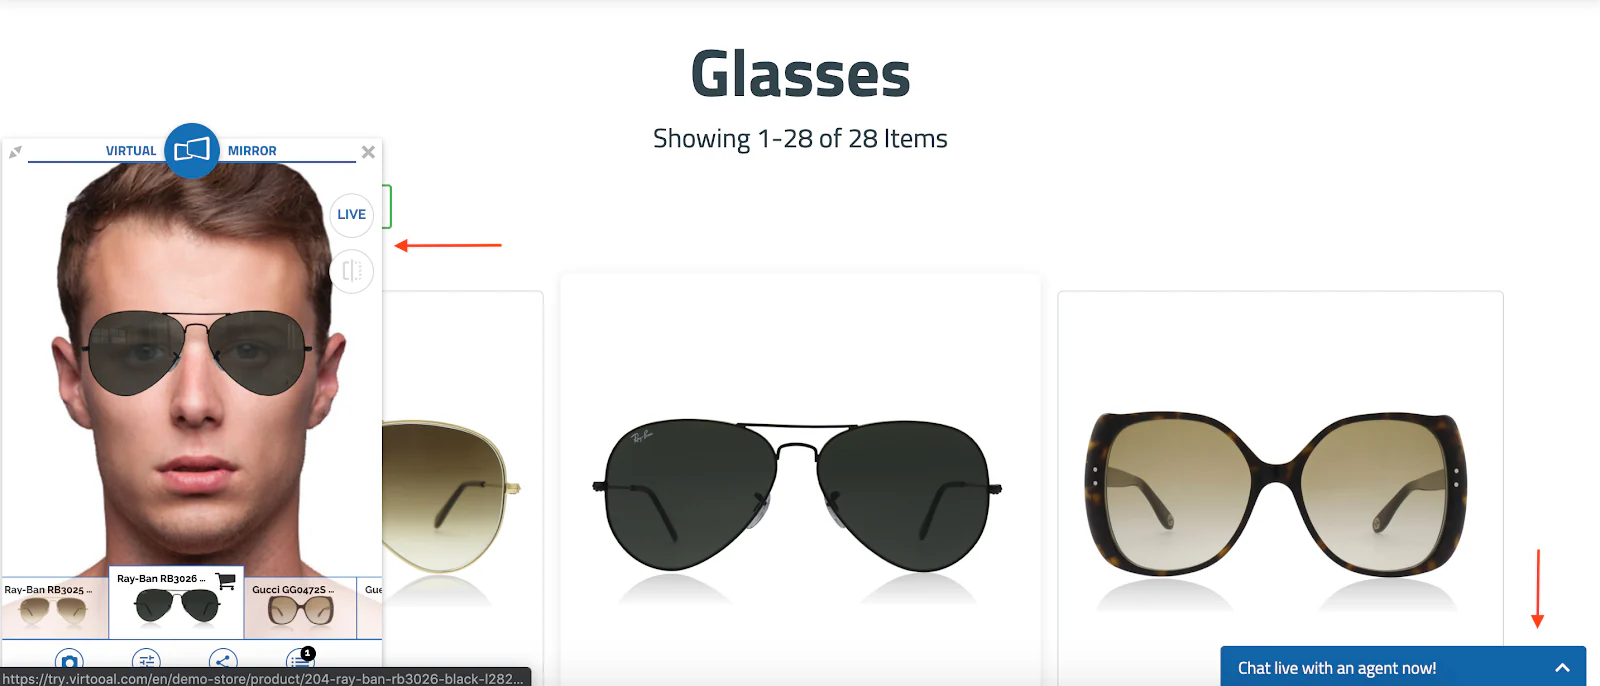
Virtual Try-On: Implement virtual try-on technology, similar to Lenskart, using apps from Virtual to let customers see how products will look on them.
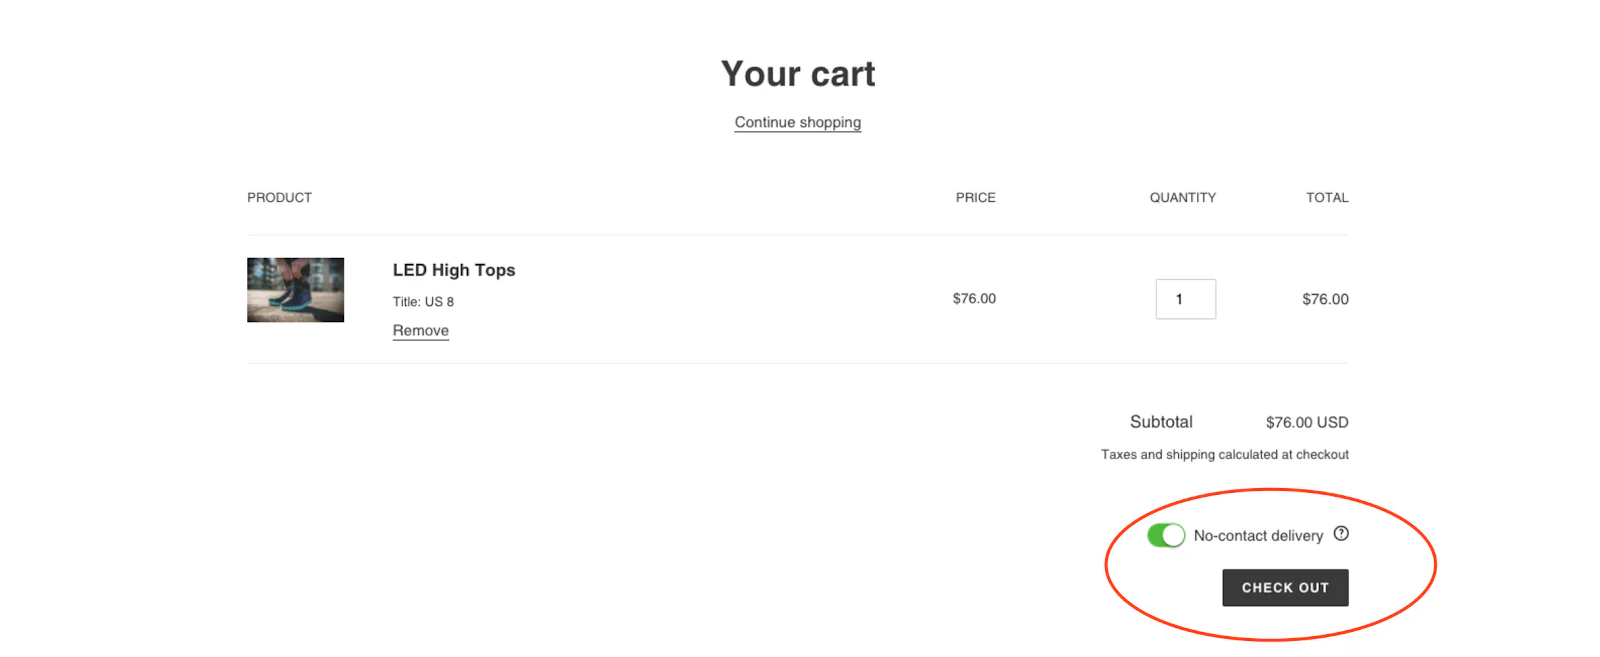
Step 5: Customize your cart
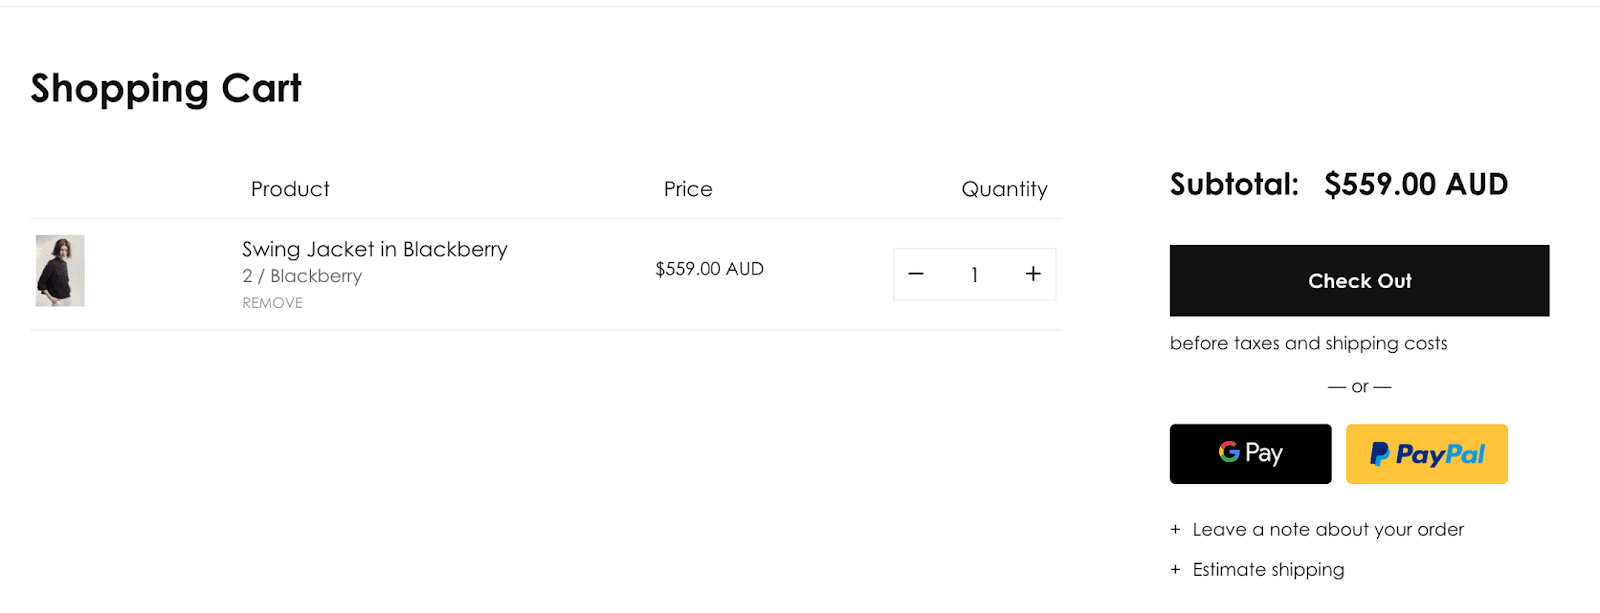
Your cart page is crucial for your online store’s success. It should clearly display the products and pricing, and be free from distractions to ensure a smooth checkout process.
- Customize Design
- Go to the Shopify dashboard, click ‘Online Store,’ then ‘Customize’ under the ‘Live Theme’ section to align the theme with your brand.
- In ‘Theme Settings,’ select ‘Cart’ and choose between a drawer or page cart. The drawer appears without reloading the page.
- Enable ‘Order notes’ for special instructions.
- Save your changes.
- Add Payment Methods
- Offer multiple payment options to accommodate customer preferences. Go to ‘Settings’ > ‘Payment Providers’ to set them up.
- Shopify supports various payment methods in India, including cash on delivery. Details can be found in our payment gateways section.
- Include Shipping Fees
- Add shipping costs to be automatically applied to orders. Go to ‘Settings’ > ‘Shipping,’ click ‘Manage Rates,’ and adjust prices based on shipping costs. Save your changes.
- Customize Checkout
- In ‘Settings,’ go to ‘Checkout’ to adjust checkout settings. Decide if customers need to create an account and select the information you want to collect.
This streamlined version covers the essentials of cart customization, payment setup, shipping fees, and checkout processes.
Step 6: Customize emails
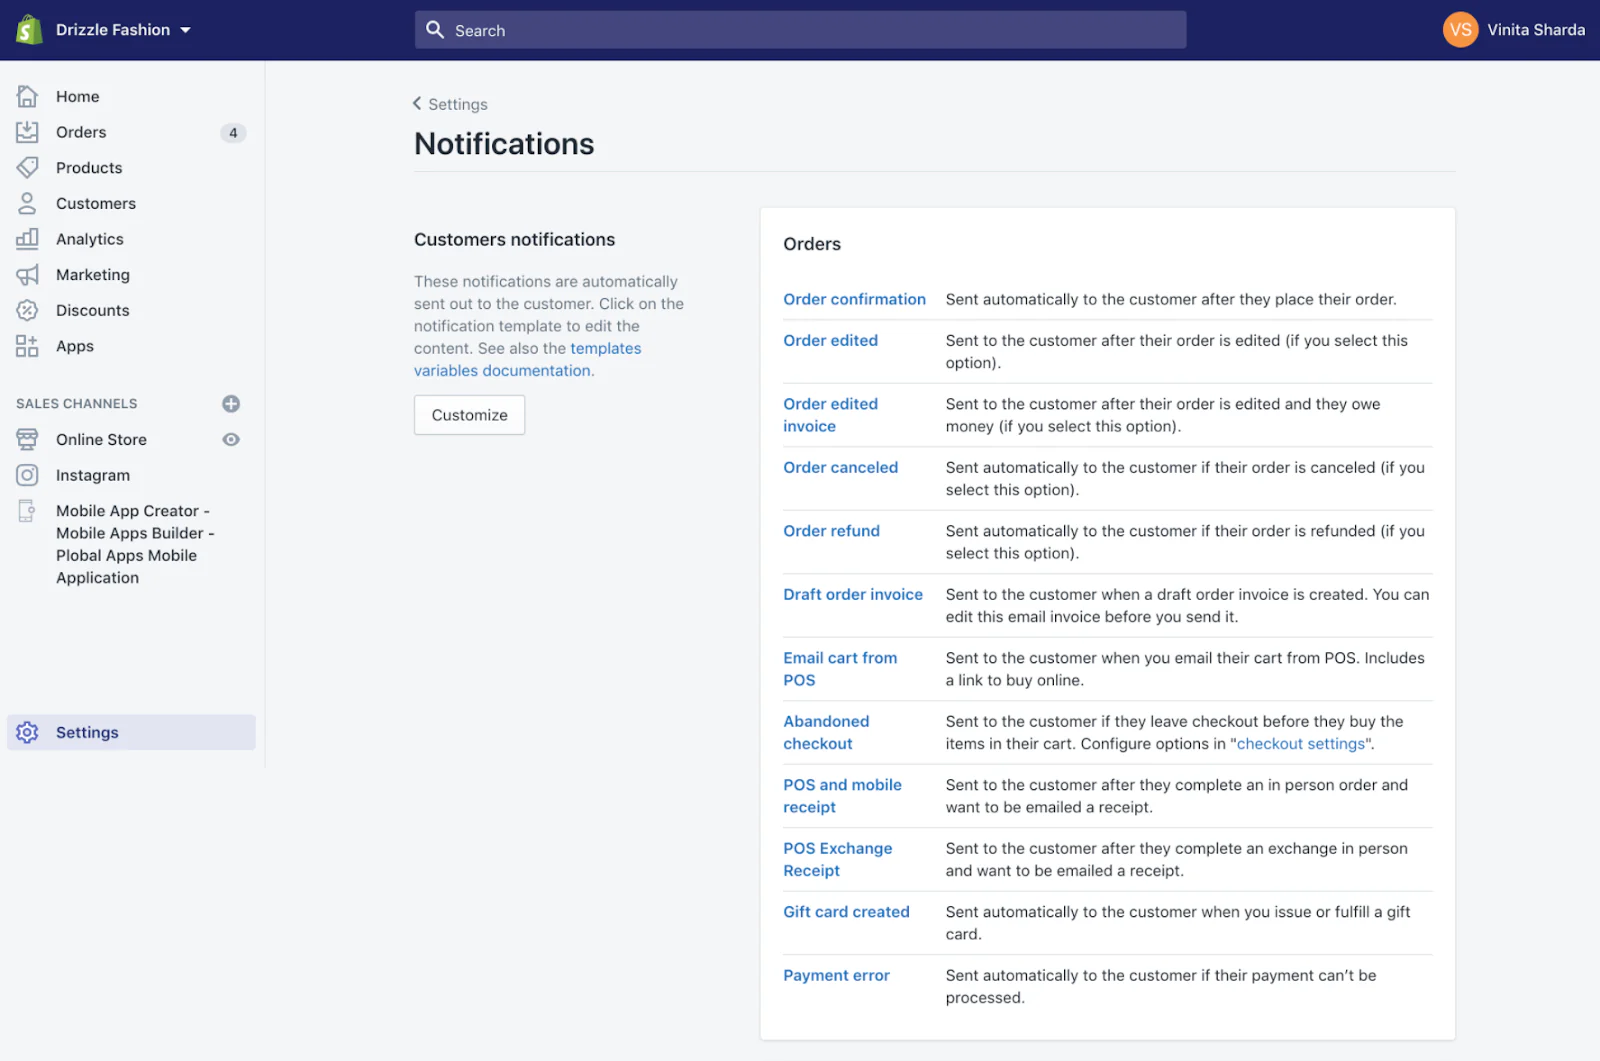
To keep your shoppers informed about their orders, use transactional emails. These automated, real-time messages notify customers about order confirmations, shipping updates, and delivery statuses, enhancing their overall experience.
To set up and customize transactional emails in Shopify:
- Go to ‘Settings’ on the Shopify dashboard.
- Click on ‘Notifications’ to view and configure various messages.
- Select the notification you wish to edit, customize the email subject and body (including customer first name), and then click ‘Save’.
-
Step 7: Delivery
-
- Partner with a Local Delivery Service
Research delivery companies in your area that align with your product types, customer needs, and expected delivery speeds. Shopify website devlopment India integrates with major delivery services, making it easy to find a suitable partner.
-
- Implement No-Contact Delivery
Ensure a safe and contactless delivery option for both customers and couriers. Use the No-Contact Delivery app to allow customers to provide specific delivery instructions, such as leaving orders at a designated spot or calling them an hour before arrival. You can also use apps like Order Delivery Date to let customers schedule their preferred delivery time.
-
- Update Customers on Delivery Status
Ensure your customers stay informed about their order status to help them plan their future purchases. Install the AfterShip app to streamline this process. In addition to email marketing and text notifications, consider integrating Messenger and web push notifications for enhanced communication.
-
Need help in understanding how to start an online store
Navigating the complexities of launching an online store, grasping consumer shopping behaviors, and effectively reaching out to customers can be daunting.
That’s where we come in. As a trusted partner agency in India, we specialize in helping you set up your online store swiftly and efficiently.
Our Digital Marketing overview covers all aspects from B2B Marketing and Inbound Marketing for B2B Business to Lead Generation and Social Media Management. With our expertise in SEO, Google PPC, etc. We ensure that your online presence is robust and effective.
With our deep expertise in eCommerce and your vision, we’ve empowered retailers to launch their online stores in less than a day, connecting with their customers faster than they ever thought possible.
Looking to create an ecommerce website that builds trust, captivates visually, and drives conversions? If you’re in Mumbai, India, and need a custom Shopify design and development solution, your search ends here! Our team of expert Shopify developers in Mumbai, India, is ready to transform your ecommerce vision into reality. Get in touch with us today for a complimentary consultation!
More Related Links
Top 10 Best Shopify Apps for Clothing Stores
How to start an online store in India for your Fashion and Apparel business
About Author
 Meet Ritu, an expert writer in Shopify, ecommerce, and web development. Her articles provide insightful guidance navigating the online retail and web technology landscapes.